In Search of the Perfect Virtual Classroom Setup
In November 2019, we were gearing up to make a push into virtual learning. We did some research and planned to equip our video studio with virtual classroom capabilities. The pandemic changed everything–and quickly. By mid-2020, we had settled on a good virtual classroom setup. You can see the basic layout in our article, The 5 Key Components of a Virtual Classroom.
The Virtual Classroom, Version 1.0
To summarize, we settled on a three-monitor setup. The laptop screen drove the presentation, which was shown on a second, external screen and the third screen housed all of the Zoom windows. We used a separate camera, positioned just above the laptop screen and the monitors were placed close by, minimizing the amount of “looking around”.
This kept eye-contact relatively close to a real conversation, but if you truly want eye contact with someone on a virtual call, you have to look at the camera. That makes it more natrual for the other person, but you can’t see the other person’s face, so you miss all the social cues that happen in a conversation.
But I was finally able to fix that with a tweak to the setup, which I now call…
Virtual Classroom Setup, Version 3.0
Yes, I did skip over “2.0”. This was a big enough change to merit the jump.
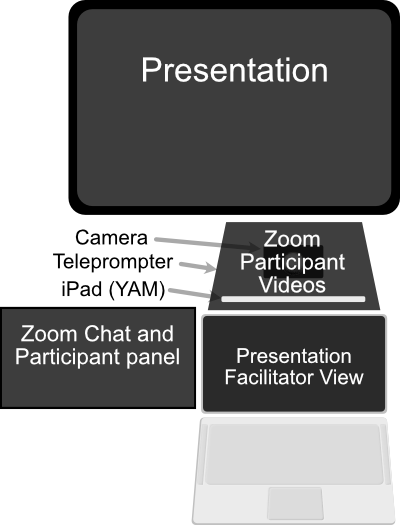
I recently completed some videos for a client’s online learning platform. These were fairly long clips, so I used a teleprompter. It’s a hassle to change over to a teleprompter and then back, so I though, why not keep it there?
I was only missing one piece: another screen to put in the teleprompter. Simple enough, but there is one problem: the monitor display has to be flipped (not rotated, but flipped) otherwise it will appear backwards when reflected in the mirror of the teleprompter. Neither Mac or Windows has a built-in way of doing that,. Some graphic cards will do it via proprietary control panels, but I have a MacBook Pro with an M1 chip and external graphics cards are not supported.

It seemed like a simple, inexpensive box that would flip the image would be ideal, but I couldn’t find one. There were two hardware solutions: a reversing monitor or a video scaling box. Neither was inexpensive
I finally solved the problem for $7.99, using my old, trusty iPad. I came across an app called YAM Display that does essentially what Apple’s SideCar does, but with the addition of a teleprompter mode, among other things. As you can guess from the name, it does exactly what I need it to do.
Since I already had the iPad, this is an inexpensive upgrade with a nice side-benefit: I now have four screens, which gives me more flexibility in where I put things like the participant panel and chat box. I do wish the iPad screen was just a little bigger, but it couldn’t be much bigger and still fit in the teleprompter.
Along Came Version 3.1
Since I started writing this article, I did one more upgrade to our virtual classroom setup. I took a spare (old) HD TV and suspended it from the ceiling of the studio. This replaced the small 5″ monitor we used to display the presentation. The bigger screen makes annotations much easier to manage.
This was something that the studio had been missing: there was no large monitor to check focus and framing. That is now resolved.
What’s Next?
Well, who knows?! That’s the thing about the future: It’s really hard to see.
So it’s impossible to say what new developments might warrant a re-make of the current setup into a “4.0” version (I probably won’t skip a versiont next time around). But we’ll keep an eye on the space and share what we learn in buiding the perfect Virtual Classroom setup.

