Why 3 Screens?
First, a disclaimer: this is based on working with Zoom as our virtual classroom platform. As we worked with the software, it became claer tht the best way to run the class was to use three discrete screens or monitors.
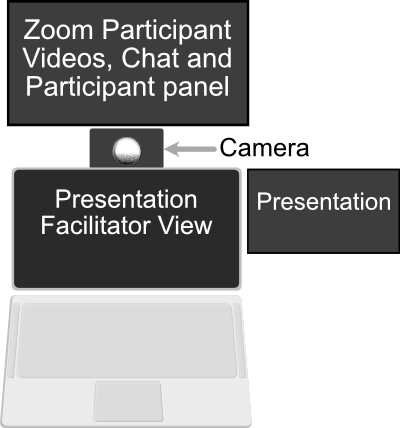
Presumably, the class is guided using a PowerPoint or KeyNote slide deck, as a screen-share. So two of the screens are dedicated to that: The main screen will display the presentation software’s “presenter view” with the preview of the next slide or build and facilitator notes. The second will show the full-screen presentation which, will be the screen share. The third screen is for everything else: your platform (Zoom) panels, like chat and the participant list, your Finder (Apple) or Explorer (Windows) and any other applications that you might need during class.
While facilitating, this arrangement allows us to see our slide deck notes (monitor 1), the participants’ videos, chat and participants panel (monitor 2) and the content being shared (monitor 3).
Setting up the Hardware
Connecting 3 Screens
Having two monitors is pretty common, even for those working from home. Most computers have a built-in port for a second display (typically DisplayPort or HDMI). Adding a second screen is a simple matter of buying one and plugging it in.
For the third screen, you may need to buy a USB-to-HDMI adapter to have a place to plug in the third screen. And you might have to buy that third screen. Fortunately, both are relatively inexpensive. An adapter can be had for $20 or less and there are a lot of decent monitors available for under $150.
A quick note MacBook with the original M1 chip: These computers only support one external monitor. It is possible to use a DisplayLink Adapter to connect more than one, but there is not guarantee that this will work indefinitely. To future-proof your investment, we recommend avoiding this generation of Mac hardware.
If you have an iPad and an Apple computer, you can use SideCar or YAM Display to use your iPad as an additional screen.
Physically Arranging 3 Screens
The goal here is to arrange the screens in such a way as to minimize the amount of looking around required to see everything. Imagine being in a physical classroom and frequently looking over at a side wall. It would be odd. When your eyes move far away from the camera, it looks odd to the learners.
Avoid this disctraction by placing the screens close to and clustered around the camera.
The image shown represents our original setup. The monitors were on the small side and were clustered rightly around the camera. The laptop was elevated on a stand so that the camera was eye-level. While we use a separate camera, the webcam in the laptop would work well, too.

Arranging the Screens in Software
Both Mac and Windows operating systems allow you to specify the physical layout of the screens. How to do that is beyond the scope of this article, but take the time to set this up. There is a lot going on during a virtual class and you don’t need the extra mental load of trying to remember which way to move the mouse to get to an adjacent screen,
Practice, Practice, Practice!
With this setup, you will project a professional presence in your virtual training. It takes a little practice to be fluent, but it’s worth the investment of time.
You can practice without having a class by starting a meeting and then joining with at least one other device. Two or more devices is better. Fortunately with Zoom, any device will do: phone, tablet, laptop, etc.
It Works!
We have used this setup on many occasions and it works well. If there are additional windows to be shared during the class, such as a browser window, have it open on the presentation nonitor (3). That content will disappear behind the presentation show when it’s active. As soon as you select the other window, it will appear in front of the presentation (you don’t need to stop the presentation).
There are more advanced ways to set up a virtual classroom (see Virtual Classroom Setp 3.0), but this works quite well. Let us know if you use a similar or different setup in the comments section below.

